
Join Raspberry Pi to Active Directory (Rasbpian) Using Realmd
I’ve been working with Ansible lately so I’ve been trying to automate everything I can. I work with Linux systems in AD, so I’ve been trying to figure out a way to auto deploy and join to my domain. Since I had a few Pis laying around, I decided to set them up on my domain as well. I will also include a link to my Ansible playbook that automates this process. This guide assumes you have updated your apt repositories recently.
Big thanks to Wolfhaven’s excellent post on this topic.
Be sure to check out my Raspberry Pi Headless setup (coming soon) using PiBakery to auto-connect to your wireless to automate this process even more.
I’m running this on Raspbian Jessie Lite 4.4.
Required Packages
- ntp
- python-pip
- realmd
- sssd
- adcli
- krb5-user
- sssd-tools
- samba-common
- packagekit
- samba-common-bin
- samba-libs
Hostname
In order for Kerberos to resolve correctly, you will need to add your fully qualified domain name to your hosts file. At this point you’ll probably want to rename your pi to whatever hostname you are going to stick with. You’ll need to edit /etc/hosts and /etc/hostname.
/etc/hostname
raspi-name
/etc/hosts
127.0.0.1       localhost
::1             localhost ip6-localhost ip6-loopback
ff02::1         ip6-allnodes
ff02::2         ip6-allrouters

127.0.1.1       raspiname.domain.local raspiname
I usually reboot the pi after changing the hostname file.
NTP
For Kerberos, the Pi needs to point to the same NTP server as the Domain Controller. In my case, I use my PDC as my NTP server. Make sure you have the ntp package installed.
sudo apt install -y ntp
Once NTP is installed, edit the ntp.conf file and point it to your NTP server.
File Location: /etc/ntp.conf
My example ntp.conf:
driftfile /var/lib/ntp/drift

restrict 127.0.0.1
restrict -6 ::1

server NTPSERVER
Make sure you restart the ntp service to reflect your changes.
sudo systemctl restart ntp
Run ntpq -p to verify ntp is pointing to the correct server.
ntpq -p

     remote           refid      st t when poll reach   delay   offset  jitter
==============================================================================
*your.ntp.server 66.79.167.34     3 u  330 1024  377    0.826   -9.921  14.298
You can also use ntpstat to get simplified results:
ntpstat

synchronised to NTP server (your.ip.address) at stratum 4
   time correct to within 196 ms
   polling server every 1024 s
Install Required Packages
sudo apt install -y ntp python-pip realmd sssd adcli krb5-user sssd-tools samba-common packagekit samba-common-bin samba-libs
Kerberos
Kerberos may pop up with a config and ask you for the Kerberos 5 default realm. This is your base AD Domain in all caps. YOURDOMAIN.COM or YOURDOMAIN.LOCAL. To verify this is set correctly, check your /etc/krb5.conf file. Here’s my example file:
[libdefaults]
        default_realm = YOURDOMAIN.LOCAL


[login]
        krb4_convert = true
        krb4_get_tickets = false
Your krb5.conf file will probably have a lot of MIT Kerberos configuration items, but the key line to make sure exists is the
[libdefaults]
        default_realm = YOURDOMAIN.LOCAL
Again, make sure it’s in all CAPS.
Avahi Configuration change
This is an important step if you are using a domain with a .local FQDN.
Thanks to the information from this post, I was able to figure out why I wasn’t able to resolve my .local devices using DNS. By default, avahi fails if mDNS is enabled and the host is not found in mDNS. You can fix this so that if something isn’t found in mDNS, it will fail over to your local DNS server. We have to edit two files to fix this with the version of Raspbian Jessie that I’m using.
Edit /etc/nsswitch.conf and remove the text [NOTFOUND=return]. Your text should look like:
hosts:          files mdns4_minimal dns
#hosts:          files mdns4_minimal [NOTFOUND=return] dns
I copied the original line and just commented it out. Save that config and then edit /etc/avahi/avahi-daemon.conf. Find the line containing #domain-name=.local, uncomment it, and change it to domain-name=.alocal. In my config, the text is located at line 23. Your config should now contain:
...
[server]
#host-name=foo
domain-name=.alocal
...
Save the file and run
sudo systemctl restart avahi-daemon.service
You can test and make sure this worked by pinging a device on your network using the FQDN with devicename.yourdomain.local.
sssd
Make sure your /etc/sssd/sssd.conf file contains something simliar to:
[sssd]
domains = yourdomain.local
config_file_version = 2
services = nss, pam

[domain/yourdomain.local]
ad_domain = yourdomain.local
krb5_realm = YOURDOMAIN.LOCAL
realmd_tags = manages-system joined-with-adcli
cache_credentials = True
id_provider = ad
krb5_store_password_if_offline = True
default_shell = /bin/bash
ldap_id_mapping = True
use_fully_qualified_names = False
fallback_homedir = /home/%u
access_provider = ad

auth_provider = ad
chpass_provider = ad
access_provider = ad
ldap_schema = ad
dyndns_update = true
dyndns_refresh_interval = 43200
dyndns_update_ptr = true
dyndns_ttl = 3600
PAM config /etc/pam.d/common-session
Make sure your /etc/pam.d/common-session has the following line in it:
session required pam_mkhomedir.so skel=/etc/skel/ umask=0022
This should ensure home directories work correctly.
Realmd
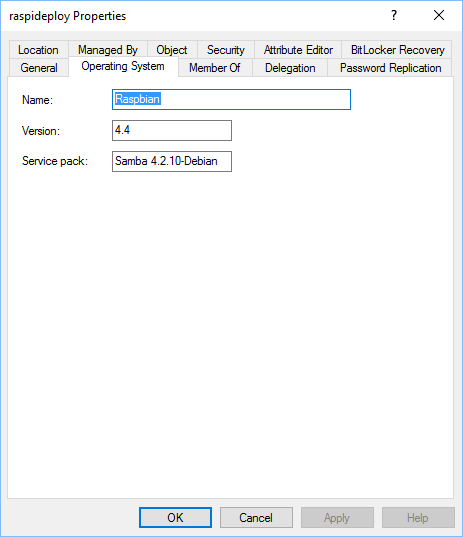
Make the following changes to your /etc/realmd.conf file. You can leave out the OS info if you want, but this is what is shown in your active directory computer object. When I’m using Ansible, I have Ansible auto-fill in this information to dynamically match the OS info.
[active-directory]
os-name = Raspbian
os-version = 4.4

[service]
automatic-install = yes

[users]
default-home = /home/%u
default-shell = /bin/bash

[yourdomain.local]
user-principal = yes
fully-qualified-names = no
Setting the fully-qualified-names allows you to log on with your active directory account as user instead of [email protected]. The [users] section configures the home directory for new accounts as they log in, and configures the default shell.
With your realmd.conf file created, you should now be able to discover the realm. Run the command:
realm discover
Depending on how you’ve set up your IP address (DHCP or static) and whether or not your NIC is set to auto-discover your domain, you may get results about your domain or it may return with:
See: journalctl REALMD_OPERATION=r128938.5757
realm: No default realm discovered
If nothing shows up by default, try the command:
realm discover yourdomain.local
That should get you some results. Mine gives me:
mydomain.local
  type: kerberos
  realm-name: MYDOMAIN.LOCAL
  domain-name: mydomain.local
  configured: no
Once you are discovering properly, you can move on to the next step.
Kerberos Ticket
To get a Kerberos ticket, run the command:
kinit -V AD-Username
If everything is configured correctly, you should receive a ticket.
Using default cache: /tmp/krb5cc_1000
Using principal: [email protected]
Password for [email protected]:
Authenticated to Kerberos v5
Now you can join the domain by running:
sudo realm join -U username yourdomain.local
If everything worked, you should now see the AD Computer Object in your ADUC panel.
You can verify this is working by using the following command on an Active Directory username:
id username
That should return the uid and a list of groups that username is a part of. You can now log into your pi using your active directory credentials!
Add Domain Admins to Sudoers
You can add your Domain Admins group to allow sudo automatically. You can configure this to work with any group, not just Domain Admins. Make sure the following line exists when running sudo visudo.
%domain\ admins ALL=(ALL:ALL) ALL
Add that somewhere in your sudoers file. If you are a member of Domain Admins, whenever you log in you are automatically granted sudo rights.